This chapter shows you how to create a custom device settings dialog.
The sample program can be found in the %TOPLEVEL%\Samples\VCx\Making Device Settings directory. In order to run the program, open the project file "MakingDeviceSettings.vcproj" in this directory and select "Build" in the toolbar. Then the program can be executed by selecting "Execute Program".
IC Imaging Control also offers a built-in dialog, which can be used to select and set up a device. If, however, the dialog provided by IC Imaging Control does not fit your needs, this chapter shows you how to create a custom dialog.
In order to use the custom device settings dialog, you will need a main application that calls the dialog. The sample program of this chapter contains a dialog based main application that calls the dialog. To set up such a project, follow the steps as described in the FirstSteps chapter, except that this sample is a "Dialog based" type of application instead of a "Single Document" type as described in the FirstSteps.
The main program contains a button labeled "Device". If this button is clicked, the device settings dialog is called with the following code:
CDeviceDlg dlg( &m_Grabber, this ); // Call the dialog if( dlg.DoModal() == -1 ) { AfxMessageBox( TEXT("The dialog could not be created") ); return; } �����
CDeviceDlg is the class that contains the device settings dialog. m_Grabber is an instance of the grabber class of IC Imaging Control, which is used by the main application. It is passed to the dialog class at construction time, in order to allow the device settings dialog to change the settings. Finally, dlg.DoModal shows the actual dialog. This is all you need, to call the dialog.
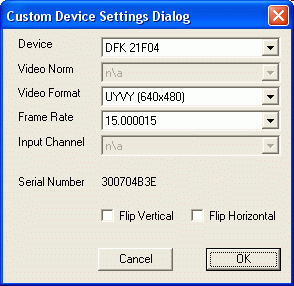
To create the dialog, choose "Insert" from the menu and then select "Resource...". Select "Dialog" and click the "New" button. Now choose "View" from the menu and select "ClassWizard...". The class wizard dialog opens, asking you to create a new class for the dialog. Click the "OK" button and name the class CDeviceDlg. Now add 5 combo boxes, 2 check boxes and a static text field to the form, in order to display the serial number.
First, we need a data structure that will store the state of the device. This is necessary since that state has to be restored, if the user clicks the "Cancel" button of the dialog. For this sample, the data structure is contained in the dialog class's header file ("DeviceDlg.h" in this sample) and looks as follows:
struct Settings { bool bDeviceAvail; std::string szDevice; bool bVideoNormAvail; std::string szVideoNorm; std::string szVideoFormat; bool bFrameRateAvail; double lfFrameRate; bool bInputChannelAvail; std::string szInputChannel; bool bFlipVAvail; bool bFlipV; bool bFlipHAvail; bool bFlipH; }; ��������������������
Add 2 private member variables to the dialog class:
Grabber*    m_pGrabber;
Settings    m_tDeviceState;
In order to initialize the dialog correctly, its standard constructor must be extended as follows:
CDeviceDlg::CDeviceDlg( Grabber* pGrabber, CWnd* pParent ) : CDialog(CDeviceDlg::IDD, pParent), m_pGrabber( pGrabber ) { //{{AFX_DATA_INIT(CDeviceDlg) //}}AFX_DATA_INIT } �����
When the dialog is called, the device combo box has to be filled with appropriate values. Also, the state of the currently valid device has to be saved. This is done with the OnInitDialog function. To add the function, open the class wizard and choose CDeviceDlg as "Class name". As "Object ID", choose the class itself and as "Message", choose "WM_INITDIALOG". Now click on "Add Function" and add the following code to it:
BOOL CDeviceDlg::OnInitDialog() { CDialog::OnInitDialog(); if( m_pGrabber->isDevValid() ) { if( m_pGrabber->isLive() ) { // Display a message that the dialog cannot be displayed while the // grabber is in live mode. AfxMessageBox( TEXT("The device settings dialog is not available while the live video is running.\n\nStop the live video first.") ); // call the click event of OK button of the super class CDialog::OnOK(); return TRUE; } } // Store the state of the currently valid device. saveDeviceSettings(); // Fill the device combo box with appropriate values. updateDevices(); return TRUE; // return TRUE unless you set the focus to a control // EXCEPTION: OCX Property Pages should return FALSE } �����������������������
It is important to note that the OnInitDialog function also performs a check, whether the grabber is in live mode. If so, it displays a message that the dialog cannot be displayed while the grabber is in live mode. This behavior was implemented to point out that changing the device will cause side effects.
If the user clicks the "Cancel" button of the dialog, the state of the device has to be restored, in order to undo all changes. To do this add a click event for the "Cancel" button and insert the following code:
void CDeviceDlg::OnCancel() { restoreDeviceSettings(); CDialog::OnCancel(); } ���
The function restoreDeviceSettings restores the previously saved state of the device. The functions saveDeviceSettings and restoreDeviceSettings are implemented as follows:
void CDeviceDlg::saveDeviceSettings() { if( m_pGrabber->isDevValid() ) { m_tDeviceState.bDeviceAvail = true; m_tDeviceState.szDevice = m_pGrabber->getDev().toString(); if( m_pGrabber->isVideoNormAvailableWithCurDev() ) { m_tDeviceState.bVideoNormAvail = true; m_tDeviceState.szVideoNorm = m_pGrabber->getVideoNorm().toString(); } else { m_tDeviceState.bVideoNormAvail = false; } m_tDeviceState.szVideoFormat = m_pGrabber->getVideoFormat().toString(); if( m_pGrabber->isFrameRateListAvailable() ) { m_tDeviceState.bFrameRateAvail = true; m_tDeviceState.lfFrameRate = m_pGrabber->getFPS(); } else { m_tDeviceState.bFrameRateAvail = false; } if( m_pGrabber->isInputChannelAvailableWithCurDev() ) { m_tDeviceState.bInputChannelAvail = true; m_tDeviceState.szInputChannel = m_pGrabber->getInputChannel().toString(); } else { m_tDeviceState.bInputChannelAvail = false; } if( m_pGrabber->isFlipVAvailable() ) { m_tDeviceState.bFlipVAvail = true; m_tDeviceState.bFlipV = m_pGrabber->getFlipV(); } else { m_tDeviceState.bFlipVAvail = false; } if( m_pGrabber->isFlipHAvailable() ) { m_tDeviceState.bFlipHAvail = true; m_tDeviceState.bFlipH = m_pGrabber->getFlipH(); } else { m_tDeviceState.bFlipHAvail = false; } } else { m_tDeviceState.bDeviceAvail = false; } } ��������������������������������������������������������
void CDeviceDlg::restoreDeviceSettings() { if( m_tDeviceState.bDeviceAvail ) { m_pGrabber->openDev( m_tDeviceState.szDevice ); if( m_tDeviceState.bVideoNormAvail ) { m_pGrabber->setVideoNorm( m_tDeviceState.szVideoNorm ); } m_pGrabber->setVideoFormat( m_tDeviceState.szVideoFormat ); if( m_tDeviceState.bFrameRateAvail ) { m_pGrabber->setFPS( m_tDeviceState.lfFrameRate ); } if( m_tDeviceState.bInputChannelAvail ) { m_pGrabber->setInputChannel( m_tDeviceState.szInputChannel ); } if( m_tDeviceState.bFlipVAvail ) { m_pGrabber->setFlipV( m_tDeviceState.bFlipV ); } if( m_tDeviceState.bFlipHAvail ) { m_pGrabber->setFlipH( m_tDeviceState.bFlipH ); } } else { m_pGrabber->closeDev(); } } ������������������������������
To handle the controls of the dialog, use the class wizard to add a "CBN_SELCHANGE" event for every of the 5 combo boxes. Also add the "BN_CLICKED" events for both check boxes. To access the controls, finally add a member variable for every combo box, for the check boxes and for the static text field that should display the serial number of a device.
The code for the "CBN_SELCHANGE" event for the device combo box looks as follows:
void CDeviceDlg::OnSelchangeComboDevice() { // Open the device if( m_cboDevice.IsWindowEnabled() ) { CString device; m_cboDevice.GetWindowText( device ); if( m_pGrabber->openDev( (LPCTSTR)device ) ) { __int64 iSerial; CString serial; // Try to read out the serial number if( m_pGrabber->getDev().getSerialNumber( iSerial ) ) { // Display serial serial.Format( TEXT("%I64X"), iSerial ); m_staticSerialOut.SetWindowText( serial ); } else { // Display "n\a" m_staticSerialOut.SetWindowText( NOT_AVAILABLE ); } // Update the other controls, since they depend on the current device. updateVideoNorms(); updateInputChannels(); updateFlip(); } } } ������������������������������
The code above reads out the selected text of the combo box. Then the selected device is opened. After that, the serial number is read out and displayed. If the serial number of the device cannot be retrieved, or the device has no serial number, "n\a" is displayed (NOT_AVAILABLE is actually a define for "n\a"). Then, the other controls are updated with a call to the respective "update" function.
The code for the other "CBN_SELCHANGE" events is even easier. Take a look at the code for the input channel combo box:
void CDeviceDlg::OnSelchangeComboInputchannel() { if( m_cboInputChannel.IsWindowEnabled() ) { CString inputchannel; m_cboInputChannel.GetWindowText( inputchannel ); if( !m_pGrabber->setInputChannel( (LPCTSTR)inputchannel ) ) { AfxMessageBox( TEXT("Input Channel Error") ); } } } �����������
The function just retrieves the selected text of the combo box and sets the input channel accordingly. The code for the other combo boxes is similar, except that the "CBN_SELCHANGE" event for the video norm calls "updateVideoFormats", because the video format depends on the video norm and the "CBN_SELCHANGE" event for the video format calls "updateFrameRates" for the same reason. Also the code for the frame rates must be modified because the setFPS method accepts variables of type double as a parameter, but m_cboFrameRate.GetWindowText returns a string.
Now the code for the check boxes:
void CDeviceDlg::OnCheckFlipv() { if( m_pGrabber->isFlipVAvailable () ) { m_pGrabber->setFlipV( m_chkFlipV.GetCheck() == 1 ); } } �����
The code for the horizontal flip is similar.
Now let us take a look at the update functions. There is an update function for every combo box. They are used to fill the respective combo box with appropriate values. Here is the code for the updateDevice function:
void CDeviceDlg::updateDevices() { // Clear combo box m_cboDevice.ResetContent(); // Retrieve the list of available video capture devices. Grabber::tVidCapDevListPtr pVidCapDevList = m_pGrabber->getAvailableVideoCaptureDevices(); if( pVidCapDevList == 0 || pVidCapDevList->empty() ) { m_cboDevice.AddString( NOT_AVAILABLE ); m_cboDevice.EnableWindow( false ); m_cboDevice.SetCurSel( 0 ); return; } m_cboDevice.EnableWindow( true ); // Fill the combo box for ( Grabber::tVidCapDevList::iterator it = pVidCapDevList->begin(); it != pVidCapDevList->end(); ++it ) { m_cboDevice.AddString( it->toStringW().c_str() ); } // Select the currently valid device if( m_pGrabber->isDevValid() ) { m_cboDevice.SelectString( -1, m_pGrabber->getDev().toStringW().c_str() ); } // Update the other controls since they depend on this one. updateVideoNorms(); updateInputChannels(); updateFlip(); } ������������������������������
The code for the other combo boxes is basically the same.
And finally the code for the updateFlip function:
void CDeviceDlg::updateFlip() { // Check horizontal flip. if( m_pGrabber->isFlipHAvailable() ) { m_chkFlipH.EnableWindow( true ); if( m_pGrabber->getFlipH() ) { m_chkFlipH.SetCheck( 1 ); } else { m_chkFlipH.SetCheck( 0 ); } } else { m_chkFlipH.EnableWindow( false ); m_chkFlipH.SetCheck( 0 ); } // Check vertical flip. if( m_pGrabber->isFlipVAvailable() ) { m_chkFlipV.EnableWindow( true ); if( m_pGrabber->getFlipV() ) { m_chkFlipV.SetCheck( 1 ); } else { m_chkFlipV.SetCheck( 0 ); } } else { m_chkFlipV.EnableWindow( false ); m_chkFlipV.SetCheck( 0 ); } } ��������������������������������������