This chapter shows you how to create your own image processing functions.
The source code to this sample application can be found in the samples\VB6\Image Processing directory.
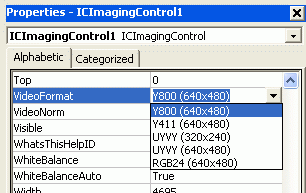
Create a new project and add IC Imaging Control to the form. Before you run the program, select the video device, input and video format as shown in the First Steps in Visual Basic 6 chapter. Alternatively, run the program without selecting a device. In this case, the program shows the device selection dialog provided by IC Imaging Control. If you close this dialog without having made a selection, the program will display an error message and terminate.
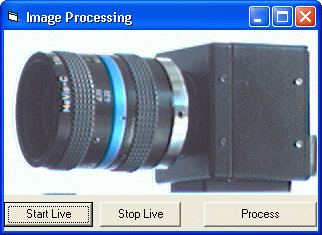
Add 3 buttons to the form and label them Start Live, Stop Live and Process. Name them cmdStartLive, cmdStopLive and cmdProcess respectively. Now add the following code to the Click events of the buttons:
First, an image is captured automatically when the LiveStop method is called. This can either be done directly by clicking the Stop Live button, or implicitly by clicking the Process button. The variable VideoHasStarted is used to determine whether live video has been started at least once, in which case image processing can be performed.
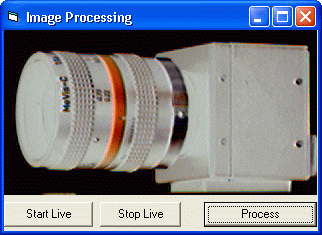
The image data returned by MemoryGetImageData can be accessed as a 2-dimensional array of bytes. The two nested for..next loops are typical for image processing algorithms, in that they access individual pixels of the image by specifying their coordinates. The algorithm shown here simply inverts the image. Finally, a call to MemoryReleaseImageData is required to release the image buffer.
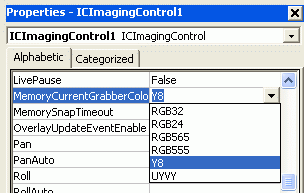
The sample code above requires 8-bit or 24-bit image data, so we need to select an appropriate value for the MemoryCurrentGrabberColorformat Property:
If a image buffer format is selected, which has more than 8 bits per pixel, MemoryGetImageData will still return an array of bytes, but with a width that is a multiple of the image width. For instance, if the video format is RGB24(640x480), 640 by 480 pixels with 3 bytes per pixel, then the image buffer will be 1920 by 480 bytes in size.
For RGB24, the pixel data has to be interpreted as follows: The first byte of a row is the blue value of the first pixel, the second byte is the green value of the first pixel and the third byte is the red value of the first pixel. The fourth byte is the blue value of pixel 2, and so on.
And this is what the result will look like:
While possible and required in some cases, you should avoid using different formats for VideoFormat and MemoryCurrentGrabberColorformat, because the image data then needs to be converted, resulting in poor performance.