The UYVY color format is basically a 16 bit color format. In contrast to the RGB formats, it contains no values for red, green or blue. It uses values for luminance and chrominance instead. Y stands for the luminance. U (or Cb) and V (or Cr) describe the chrominance. For further details refer to the following link:
http://www.fourcc.org
The organization of the pixels in the image buffer is from left to right and top down.
A video capture device, video format, FrameSnapSink, which defines the image data color format must have been setup. The following code fragments show step-by-step how to access and manipulate the pixel data of UYVY.
First of all, we have to capture an image. Otherwise, the image buffer would be empty. To do so, we start live mode and call FrameSnapSink::snapSingle.
The following code retrieves a byte pointer to the image data. We use a structure UYVYQuad to access the different components of the pixel pairs:
// UYVY Images are stored top-down, so the upper left pixel starts at byte 0. // Each 4 bytes represent the color for 2 neighboring pixels: // // [ U0 | Y0 | V0 | Y1 ] // // Y0 is the brightness of pixel 0, Y1 the brightness of pixel 1. // U0 and V0 is the color of both pixels. struct UYVYQuad { BYTE U0; BYTE Y0; BYTE V0; BYTE Y1; }; UYVYQuad* pImgData = (UYVYQuad*)pActiveBuf->getPtr(); �������������
In this example, we want to output the first (upper left hand) four pixels of the image. In a second step, we are going to manipulate the first six pixels. Because UYVY images are stored top-down, the index of the upper left two pixels is 0:
// Calculate the index of the upper left pixel // Images are stored top-down in the image buffer, so the first two pixels have index 0. int iOffsUpperLeft = 0; �
Now that we have the offset to the the first pixel, we can read it out:
printf( "\nImage buffer pixel format is MEDIASUBTYPE_UYVY\n" ); printf( "Pixel 1 (Y U V): %d %d %d\n", pImgData[iOffsUpperLeft + 0].Y0, pImgData[iOffsUpperLeft + 0].U0, pImgData[iOffsUpperLeft + 0].V0 ); printf( "Pixel 2 (Y U V): %d %d %d\n", pImgData[iOffsUpperLeft + 0].Y1, pImgData[iOffsUpperLeft + 0].U0, pImgData[iOffsUpperLeft + 0].V0 ); printf( "Pixel 3 (Y U V): %d %d %d\n", pImgData[iOffsUpperLeft + 1].Y0, pImgData[iOffsUpperLeft + 1].U0, pImgData[iOffsUpperLeft + 1].V0 ); printf( "Pixel 4 (Y U V): %d %d %d\n", pImgData[iOffsUpperLeft + 1].Y1, pImgData[iOffsUpperLeft + 1].U0, pImgData[iOffsUpperLeft + 1].V0 ); ���������������
Please note, that while the two pixels of a pixel pair have separate Y (brightness) values, they share the color values U and V.
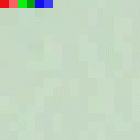
Instead of only reading pixel data, it is, of course, possible to manipulate the data as well. The following code sets the upper left six pixels to red, light red, green, dark green, blue and light blue. After this manipulation, the image is saved as a BMP file.
// Overwrite the first 6 pixels and save image to disk // set the first 2 pixels to RED pImgData[iOffsUpperLeft + 0].U0 = 90; pImgData[iOffsUpperLeft + 0].V0 = 240; pImgData[iOffsUpperLeft + 0].Y0 = 82; pImgData[iOffsUpperLeft + 0].Y1 = 164; // Make the 2nd pixel brighter // set the 3rd and 4th to GREEN pImgData[iOffsUpperLeft + 1].U0 = 54; pImgData[iOffsUpperLeft + 1].V0 = 34; pImgData[iOffsUpperLeft + 1].Y0 = 145; pImgData[iOffsUpperLeft + 1].Y1 = 72; // Make the 2nd pixel darker // set the 5th and 6th pixel to BLUE pImgData[iOffsUpperLeft + 2].U0 = 240; pImgData[iOffsUpperLeft + 2].V0 = 110; pImgData[iOffsUpperLeft + 2].Y0 = 41; pImgData[iOffsUpperLeft + 2].Y1 = 82; // Make the 2nd pixel brighter // The values above were calculated using the following formulas: // // Y = (0.257 * R) + (0.504 * G) + (0.098 * B) + 16 // V = (0.439 * R) - (0.368 * G) - (0.071 * B) + 128 // U = -(0.148 * R) - (0.291 * G) + (0.439 * B) + 128 // // We save the buffer as RGB24, so that other software can view it. saveToFileBMP( *pActiveBuf, "UYVY.bmp", eRGB24 ); ����������������������
To check the result, open the saved image and take a look at the upper left hand pixels. They should look as follows: