This example demonstrates how to draw graphic elements, such as lines and text on the live video image.
It shows, how to:
The example is located in the %TOPLEVEL%\Samples\VC\Creating an Overlay directory of the IC Imaging Control installation. It is derived from the classlib Demoapp example and implements the new overlay features.
IC Imaging Control provides a special object for drawing and writing on the live video. The object is named OverlayBitmap. The OverlayBitmap object contains a bitmap, that has the same size as the video format, or the size of a frame filter that transforms the image data before the overlay bitmap is applied. An application can draw text and graphics on this overlay bitmap. The overlay bitmap is copied to each sample of the video. A dropout color can be specified to determine, which pixels of the overlay bitmap are transparent and therefore not copied to the live video.
The overlay bitmap can only be used, if Grabber::startLive or Grabber::prepareLive has been called at least once after the video format has been changed. It is only visible, if the live video is running.
Since version 3.0, IC Imaging Control allows you to select whether the overlay is drawn on live video, on grabbed and recorded images, or both.
You can use Grabber::setOverlayBitmapPathPosition to set an ORed combination of tPathPosition values specifying the path positions at which OverlayBitmap objects will be inserted.
To access one of the 3 OverlayBitmap objects, call Grabber::getOverlay. The parameter of that method selects the position of the OverlayBitmap that is accessed.
By default, the color format of the overlay bitmap is selected automatically according to the color format of the input image data. However, you might want to draw colored lines and text on a grayscale live video. The OverlayBitmap::setColorMode method allows you to force the overlay bitmap to use color or grayscale mode.
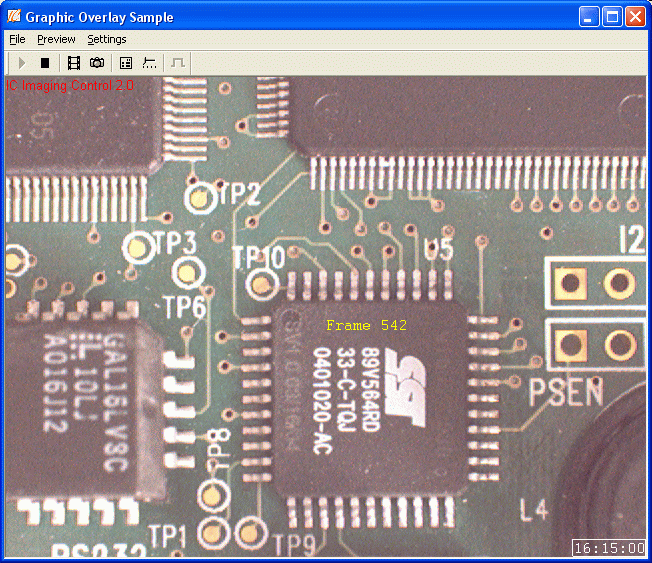
At first, we are going to display a simple text in the upper left corner of the video display. The text is visible in the captured image, as well as in a recorded AVI file.
The video capture device, video format and sink type must have been setup before an application can use the overlay for drawing. The following code is called from the void CMainFrame::OnPreviewStart() method.
void CMainFrame::drawOverlay( DShowLib::tPathPosition pos ) { smart_ptr<OverlayBitmap> ob = m_Grabber.getOverlay(pos); ob->setEnable(true); ob->setFont("Courier",14); ob->drawText( RGB(255,0,0), 0, 0, "IC Imaging Control 3.5" ); switch( pos ) { case ePP_DEVICE: ob->drawText( RGB(0,255,0), 20, 20, "Device Overlay Active" ); return; case ePP_SINK: ob->drawText( RGB(0,255,0), 20, 40, "Sink Overlay Active" ); return; case ePP_DISPLAY: ob->drawText( RGB(0,255,0), 20, 60, "Display Overlay Active" ); return; } } �����������������
At first, a pointer to an OverlayBitmap object is retrieved by calling Grabber::getOverlay with the desired path position as a parameter.
The line ob->setEnable(true); enables the overlay. If the overlay is not enabled, it is not rendered on the video stream.
After that, a font name and size is selected to format the text that is displayed.
The line ob->drawText( RGB(255,0,0), 0, 0, "IC Imaging Control 3.0" ); sets the text color, the coordinates (0,0) and the text itself that are displayed in the live video stream. The text "IC Imaging Control 3.0" is drawn in red in the upper left corner of the live video stream. The drawText method has to be called only once. The text remains on the overlay until it is deleted or overwritten.
Depending on the overlay bitmap's path position, further text is printed to indicate which overlay bitmaps are visible on the live display and in the images that are sent to the sink.
In the next step, we are going to display the current time in the lower right hand corner of the live video stream. The clock should be surrounded by a white rectangle. A timer with 1000 milliseconds delay is used for the clock. The timer events are handled in the corresponding method CMainFrame::OnTimer( UINT nIDEvent ). In this method, the method CMainFrame::displayTime is called that draws the current time by overwriting the old time.
void CMainFrame::displayTime() { CString szTimeString; // The string will contain the time. CTime cTime = CTime::GetCurrentTime(); SIZE StringSize; // Size of the rectangle that is needed by the string. smart_ptr<DShowLib::OverlayBitmap> ob; RECT TimeRect; // Displaying the time is only useful, if the live video is running. if ( m_Grabber.isLive() ) { ob = m_Grabber.getOverlay( ePP_DEVICE ); // Call beginPaint to tell the OverlayBitmap class that we start drawing and // will use a DC (device context) for GDI operations. ob->beginPaint(); // Set a font that uses a non proportional charset. ob->setFont("Courier",14); // Copy the current time to the time string. szTimeString = cTime.Format("%H:%M:%S"); // Get the size in pixels that is used by the time string in the overlay bitmap. GetTextExtentPoint32( m_Grabber.getOverlay( ePP_DEVICE )->getDC(),szTimeString, szTimeString.GetLength(), &StringSize); // This rectangle is used to draw a rectangle around the time. TimeRect.left = m_Grabber.getAcqSizeMaxX()-StringSize.cx-2; TimeRect.top = m_Grabber.getAcqSizeMaxY()-StringSize.cy-2; TimeRect.right = TimeRect.left + StringSize.cx+1 ; TimeRect.bottom = TimeRect.top + StringSize.cy+1 ; // Write the time string in the lower right corner. ob->drawText(RGB(255,255,255), TimeRect.left + 1, TimeRect.top + 1, (LPCTSTR)szTimeString); // Draw a rectangle around the time string. ob->drawLine( RGB(255,255,255), TimeRect.left, TimeRect.top, TimeRect.right, TimeRect.top); ob->drawLine( RGB(255,255,255), TimeRect.right, TimeRect.top, TimeRect.right, TimeRect.bottom); ob->drawLine( RGB(255,255,255), TimeRect.right, TimeRect.bottom, TimeRect.left, TimeRect.bottom); ob->drawLine( RGB(255,255,255), TimeRect.left, TimeRect.top, TimeRect.left, TimeRect.bottom); // Call endPaint to release the DC and tell the OverlayBitmap class // that drawing has been finished. ob->endPaint(); } } �����������������������������������������
Displaying the time on the live video only makes sense, if the live video is running. Therefore, an if( m_Grabber.isLive() ) statement is used. The font "Courier" is used to display the time. "Courier" is a non-proportional font, therefore all characters of this font have the same size. Using a non-proportional font avoids garbage pixels, if the displayed time string is shorter than the previously displayed time. The time is retrieved in a MFC CTime object and formated into a CString szTimeString object. The GetTextExtentPoint32 function computes the width and height of the time string. To display the time string in the lower right corner, the previously calculated width and height of the time string is subtracted from the live video image's width and height.
The method OverlayBitmap::beginPaint must be called, because the application needs the device context (DC) of the OverlayBitmap. If OverlayBitmap::beginPaint has not been called, the method OverlayBitmap::getDC returns 0.
A OverlayBitmap::beginPaint at the beginning of GDI graphic operations must be followed by an OverlayBitmap::endPaint at the end of all GDI graphic operations.
OverlayBitmap::beginPaint and OverlayBitmap::endPaint are not needed, if an application does not need the device context (DC) of the OverlayBitmap object and uses only the built-in graphic operations such as drawText, drawLine etc.
Note: If this code is copied to another application, please make sure, that the overlay has been enabled. If the overlay has not been enabled, the time is not displayed.
The OverlayBitmap object provides a callback for every frame of the image stream. With this callback, an application can draw frame specific data on the overlay, i.e. a frame counter. The following code example illustrates how to implement a simple frame counter that is displayed in the image stream.
At first, a handler for the callback has to be implemented. This is done by creating a new class that implements a callback method for the overlay update event. This new class is derived from the class GrabberListener that is the base class for all classes implementing a callback. The new class is called "COverlayCallback". It is a member of the class CMainFrame. The instance of COverlayCallback must be registered as a new "listener" to the Grabber. This is done in the constructor of CMainframe, after the Grabber has been instantiated.
m_Grabber.addListener(&m_cOverlayCallback, DShowLib::GrabberListener::eOVERLAYCALLBACK);
The parameter DShowLib::GrabberListener::eOVERLAYCALLBACK causes the Grabber to call the overlayCallback method only.
The declaration of the COverlayCallback class is as follows:
class COverlayCallback : public GrabberListener { public: COverlayCallback(); virtual void overlayCallback( Grabber& param, smart_ptr<OverlayBitmap> pBitmap, const tsMediaSampleDesc& ); private: int m_displayCallCount; }; ������
The Grabber calls the GrabberListener::overlayCallback method of the COverlayCallback object before the overlay is rendered onto a frame. Drawing operations can be performed in this method. The callback method is implemented in the following way:
void COverlayCallback::overlayCallback( Grabber& /*param*/, smart_ptr<OverlayBitmap> pBitmap, const tsMediaSampleDesc &MediaSample ) { CString szText; switch( pBitmap->getPathPosition() ) { case ePP_DEVICE: szText.Format( TEXT("Device: Frame %d "), MediaSample.FrameNumber ); pBitmap->drawText(RGB(255,255,0), 20, 100, (LPCTSTR)szText ); break; case ePP_SINK: szText.Format( TEXT("Sink: Frame %d "), MediaSample.FrameNumber ); pBitmap->drawText(RGB(255,255,0), 20, 120, (LPCTSTR)szText ); break; case ePP_DISPLAY: szText.Format( TEXT("Display: No Frame Number Available, called %d times"), m_displayCallCount++ ); pBitmap->drawText(RGB(255,255,0), 20, 140, (LPCTSTR)szText ); break; } } �����������������
To find out the path position of the overlay bitmap for that the callback is executed, call OverlayBitmap::getPathPosition.
In this example, a text displaying the current frame number is displayed. Because the overlay bitmap in the display path does not have access to frame numbers, a member variable m_displayCallCount is used to keep track of the call count.
The OverlayBitmap class uses a dropout color to determine, which pixel color is transparent on the video stream. Each pixel that has the dropout color is not copied on to the live video. The dropout color can be set by calling OverlayBitmap::setDropOutColor and retrieved by calling OverlayBitmap::getDropOutColor. When the overlay bitmap is created, the color of all pixels is set to the default dropout color. The default dropout color is black (RGB(0,0,0)).
An application can change the dropout color with the following line of code:
// Set dropout color to magenta.
m_Grabber.getOverlay()->setDropOutColor( RGB(255,0,255) );
Now, the live video image is completely black, because the dropout color has been changed to magenta. (Not the color of the pixels in the overlay bitmap.) All black pixels are now copied to the live video (only magenta pixels are not copied). To fill the entire overlay bitmap with magenta, use the following line of code:
// Fill the overlay bitmap with magenta (current dropout color)
m_Grabber.getOverlay()->fill( RGB(255,0,255) );
To delete a line of text that has been written on the overlay bitmap use the following lines of code:
// Draw the text with a visible color m_Grabber.getOverlay()->drawText(RGB(255,0,0), 0, 0, "Hello World" ); // To hide the text, draw it with the current dropout color again m_Grabber.getOverlay()->drawText(m_Grabber.getOverlay()->getDropOutColor(), 0, 0, "Hello World" ); ����
This simply draws the same text on the same coordinates with the current dropout color. Now, the text is invisible.