Mikroskopkamera: Mitgelieferte Kamera-Software
Veröffentlicht am 18. August 2016 von TIS Marketing.
Ursprünglich veröffentlichter Artikel in der Fachzeitschrift Mikroskopie (Jahrgang 3, Nr. 1/2016, S. 37-51) von J. Piper und M. Torzewski. Gegliedert in Abschnitt: 1, 2, 3, 4, 5, 6, 7, 8, 9, 10 und 11.
Kamera-Software
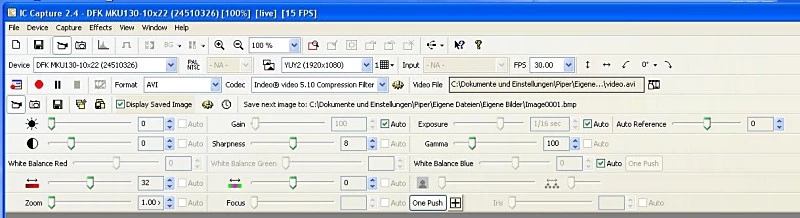
Die Capture-Software ermöglicht weitreichende Einflussnahmen des Anwenders auf das finale Bild. Zahlreiche "Toolbars" zur Regulierung qualitätsbestimmender Bildparameter können über einen "Toolbar-Manager" wahlweise angewählt oder "abgeschaltet" werden. (Abb. 4) zeigt die Gesamtheit aller zur Verfügung stehenden "Toolbars", die in einem KontrollPanel im oberen Bereich des Monitors angeordnet sind. Wie ersichtlich, können unter anderem reguliert werden: ISO-Empfindlichkeit ("Gain"), Helligkeit, Kontrast, Gamma, Schärfe, Farbsättigung, Weißabgleich, Anteile einzelner Farbkanäle, speziell Rot und Blau. Zusätzlich können Zoomfaktor (hier: 1,0), Bildauflösung (im gezeigten Beispiel: 1920 x 1080) die Framerate (hier: 30 FPS) festgelegt werden. Neben manueller Regulierung kann der Anwender auch eine automatische Einstellung der Bildparameter wählen, wenn jeweils bei "Auto" ein Haken gesetzt wird. Eine Besonderheit stellt der wahlweise zu aktivierende Autofokus dar (siehe "One Push" am unteren Rand des Menüfensters). Bei einmaligem Mausclick auf das Feld "One Push" wird das gesamte Bild gemittelt fokussiert. Zusätzlich ist eine selektive Autofokus-Funktion eingerichtet. Wenn man mit der linken Maustaste das rechts neben dem "One-Push"-Feld zu sehende kleine Quadrat mit mittigem Fadenkreuz ein Mal anklickt, kann man es anschließend mit der Maus aus dem Menüfenster lösen, frei im angezeigten Live-Bild verschieben und über einer beliebigen zu fokussierenden Stelle platzieren. Bei nochmaligem Einmal-Klick auf das Messfeld wird der markierte Bereich automatisch selektiv fokussiert. Direkt aus dem in Abb. 4. gezeigten Menüfenster heraus kann auch die Videoaufzeichnung gestartet, pausiert und gestoppt werden (vgl. rot markierten Video-Auslöser am linken Bildrand). Fotos können nach Art sonstiger Dateien auf übliche Weise mit einem einzigen Mausclick gespeichert werden, indem das Menu "File" (links oben) geöffnet und "Save Image …" angewählt wird. Der Speicherort kann frei gewählt werden.
Die Presenter-Software dient, wie dargelegt, einer ausschließlichen Life-BildschirmMikroskopie; eine Foto-oder Video-Funktion ist hier nicht implementiert. Nach Starten des Programms muss zunächst das gewünschte Video-Format vorgegeben werden. Die Voreinstellung "YuY2 (4128x3096)" erlaubt bei einer Framerate von 1 FPS keine flüssige Life-Beobachtung. Es sollte daher für routinemäßige Anwendungen auf "YUY2 (1920x1080 HD 1080)" umgestellt werden. Die voreingestellte Framerate (30 FPS) kann belassen, oder bei zu geringer Lichtausbeute auf 15 oder 20 FPS verringert werden. Mit einem Rechtsklick in das übertragene Live-Bild können Auflösung und Frame-Rate jederzeit verändert werden ("Select Device"). Zusätzlich können durch denselben Rechtsklick bei weiterhin laufender Beobachtung des Life-Bildes der One-Push-Autofokus ausgelöst werden (Untermenü "Lens") und wesentliche Bildparameter angepasst werden (Untermenüs "Color", "Exposure", "Image"). Die dort hinterlegten Funktionen entsprechen denen der Capture-Software.